Managed Image File Engineering

[Available since IsoBuster 3.4 for people with an [Enterprise] license]
This is mainly for engineers and data recovery experts. You can load an IBP/IBQ managed image file and work on it using this dialog.
Once the IBP/IBQ image file is loaded, right mouse click the combobox (the drop down control where you select the device) and choose: "Change or Test Managed Image File Properties (Experts)"
Count the amount of erroneous sectors in an area
Specify the range in which to work and the dialog will tell you how many errors there are in that range. For instance count the 'gaps' in a given range that corresponds with a file
Change the status of an area
Allows you to change the 'readable' or 'unreadable' status of blocks. For instance, if you set good (already correctly read) sectors to unreadable, you create 'gaps' for those sectors and they will be re-read when you perform a 'Complete Image: fill gaps'. Should these re-reads now fail, the good data will not be replaced with all zeroes, the previously read data will remain intact. If the read succeeds, the good data will be overwritten with the newly read data ! You can also set erronous sectors to 'readable' which means they will never be read again (untill you set them to unreadable again). You can mark a region as 'readable' or 'unreadable', also beyond what was already read, so that you can complete the image at the end, and essentially skip a whole region. Creative engineers will discover many possible ways to use this feature. When the range exceeds what was already read, IsoBuster will complete the image at the end but it will use a dummy read mechanism. No actual reads will take place, sectors will be filled with all zeroes, no matter if you set them to 'readable' or 'unreadable'. With great power comes great responsibility. Use these features wisely.
Complete Image File (Gaps and/or End) inside a range
Will complete the image, by filling up gaps and by reading at the end, but within the bounds you have set in this dialog.
Change the last processed address in the image
When you create a managed image file, IsoBuster keeps track of readable and unreadable blocks. When you stop the process at a given time, you can always load the *.ibp image again and complete it.
The point where you stopped making the image file is the 'last processed address' (LPA for the sake of this paragraph). In the visual blocks map on the right, all blocks beyond the LPA are colored grey (status unknown). When you complete a managed image file, unreadable blocks before the LPA are read one block at a time, as part of the 'filling gaps 'process. All blocks passed LPA are read normally, x blocks at a time, because their status is still unknown. In case of perfectly readable media, the latter is much faster than 'filling gaps' one block at a time. For engineering purposes it sometimes makes sense to move the LPA to a lower address again, for instance if a hardware problem was resolved, to read the part beyond the LPA normally again (and hence much faster).
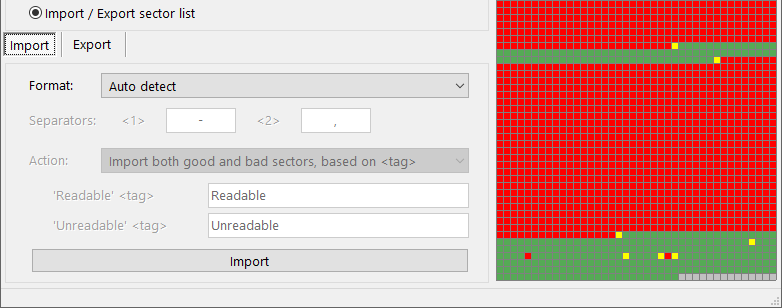
Import address ranges into the sector status bitmap
[Available since IsoBuster 4.4 for people with an [Enterprise] license]
IsoBuster supports the import of text files (also *.csv files) with addresses (and a status: readable or unreadable) into the sector status bitmap.
This way you can influence what data is already read and what data still needs to be (re)read.
It does the same as previously explained option "Change the status of an area" but based on a list of imported data.
It facilitates the exchange of data between different applications as well.
You might need to tweak the import file a bit for it to be supported properly but a non intrusive test-run will always first show you how the file is being interpreted. Also, a backup of the *.IBP file is made before import, so you can safely experiment.
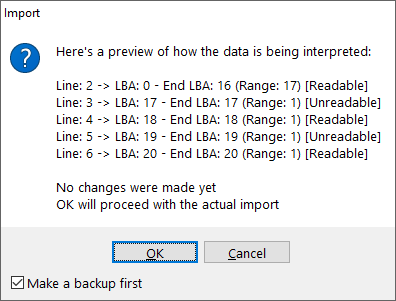
It might also be wise to do an Export first (see below) to both have an example template and a backup of current situation (that can be imported again at a later moment).
There are three supported ways to import:
- Automatic detection, where IsoBuster tries to understand the format and imports it the way it sees fit. This works pretty well and certainly supports the standard export ways IsoBuster supports.
- LBA <1> Last LBA <2> <tag> For instance "0 - 1000 readable" where 0 is the start address, 1000 is the last address (so a total of 1001 blocks), seperator <1> is '- ' and seperator <2> is ' ' and the tag is 'readable'
- LBA <1> Range (Blocks) <2> <tag> For instance "0 - 1000 unreadable" where 0 is the start address, 1000 is the range (so a total of 1000 blocks), seperator <1> is '- ' and seperator <2> is ' ' and the tag is 'unreadable'
Use the seperator and tag fields in the GUI to put your own text in, relevant to your import text file.
For instance if the line reads: "0,1000,error" you will need to put a comma in the two seperator fields and write error in the 'Unreadable tag' field.
Additionally:
The seperator fields also accept <%TAB> which is replaced with a tab character
The tag fields also accept one or more of these special tags:
<%CI> which means the tag compare test is done case insensitive.
<%WC> which means the tag compare test accepts wild cards
<%RE> which means the tag compare test accepts regular expressions
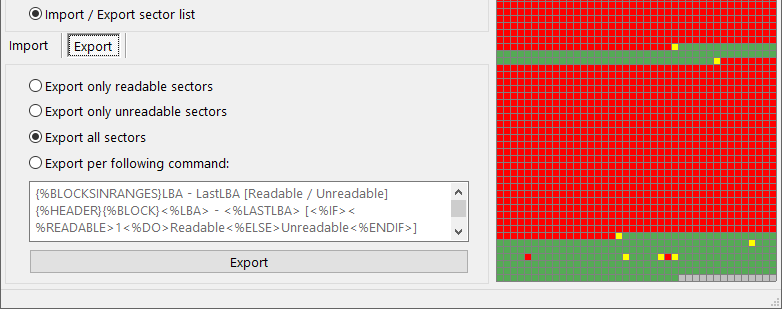
Export status bitmap address ranges into a text file
[Available since IsoBuster 4.4 for people with an [Enterprise] license]
IsoBuster supports the export of text files. There are 4 supported methods.
Create a list of only readable sectors. The template used is the one in the edit box below it.
Create a list of only unreadable sectors. The template used is the one in the edit box below it.
Create a list of all sectors but mark which ones are readable and which ones are not. The template used is the one in the edit box below it.
Create a list of sectors based entirely on your own template which you can define in the edit box below it.
The template syntax is completely based the /tree command line parameters
Also see: Create and complete a managed image file