Hoe maak ik een Video-DVD van een of meerdere VOB bestanden op mijn harde schijf
In this article we start from one or more VOB files that were recovered with IsoBuster from a Movie DVD. Only the VOB files are usable as input files, IFO and BUP files can be discarded.

If you're not sure how to get the VOB files, please read the first article of this series of articles:
There are many DVD authoring tools available but for this example we'll use NeroVision Express, to stay in context with previous articles as NeroVision is part of the Nero suite:
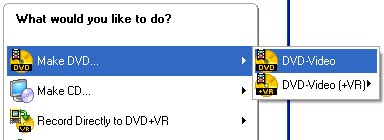
Start up NeroVision and select Make DVD -> DVD-Video:
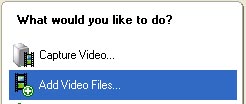
In the next window, select "Add Video Files":
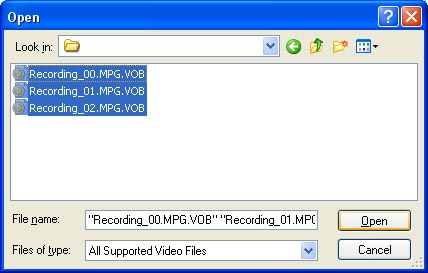
And add the VOB files you had set apart:
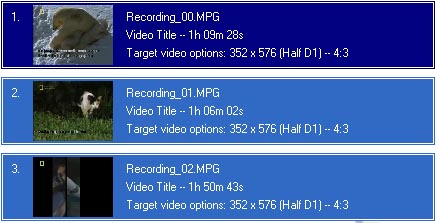
Nero now loads the different files that you selected and displays them on the left of NeroVision.
Each file gets its own chapter in the main menu:
You can dig into making extra chapters and extra menus etc. For instance, select a video fragment on the left (see picture above) and choose "Create Chapters" on the right:

In the next screen you can now make sub-chapters for this video fragment or have Nero auto-find sub-chapters for you. Click "Next" (bottom right corner) to return each time. There are obviously a lot of possibilities here and the only way to learn more about this is by actually playing with it. That's beyond the scope of this article now, we stick to the bare essentials.
After you're done making chapters and menus, maybe even editing the movie here and there, click "Next" (bottom right corner). The next window allows you to graphically define your menu layout. Again, this is beyond the scope of this article. Play with it, that's the best way to learn.
Click "Next" (bottom right corner) when you're done and you can now examine the end result. You can still go back ("Back Button") and change things if you want.
Click "Next" (bottom right corner) when you're done and enter the final stage. In the top right corner, select "Burn To" and make sure the correct drive is selected. Then, if you're ready, hit the button "Burn" (bottom right corner) and make the actual disc.
The result should be a perfect Video DVD with self created menus etc. It's fun making your own DVDs like this and you'll be the hero of your family when you master this well ;-)
You may always share your own expertise and experience to help improve these articles!