Create and complete a managed image file
As of IsoBuster 1.9 it is possible to create and complete the so called managed image files. These files consist out of a IBP file and one or more IBQ files.
You should always keep their name identical (besides the extension) and keep them in the same folder. In other words, don't rename the IBP file to for instance x.IBP and the IBQ file to y.IBQ, because then they won't link to each other anymore and IsoBuster won't be able to use them properly.
A managed image file (= combination of the earlier mentioned files) offers a way to stop extracting and resume at a later date. And when there are errors, they are marked and these blocks can be re-read to fill the gaps at a later date.
The BIG advantage of this feature is that you can create an image file of an optical disc by using one drive, but afterwards you can take the disc to another drive and try to complete the image there. Often one drive can read parts another drive can't and vice versa. So now you are able to complete an image of a disc by using different equipment to try to get the best out of each and every drive you use. Please read further to understand the possible problems. Additional advantages are that you now have the image on your hard drive and can work of the image file which is many hundreds of times faster than working from the disc itself, especially when there are hard to read errors. All functionality you would normally use on the disc itself you can now use on the image file with much greater speed.
Creation
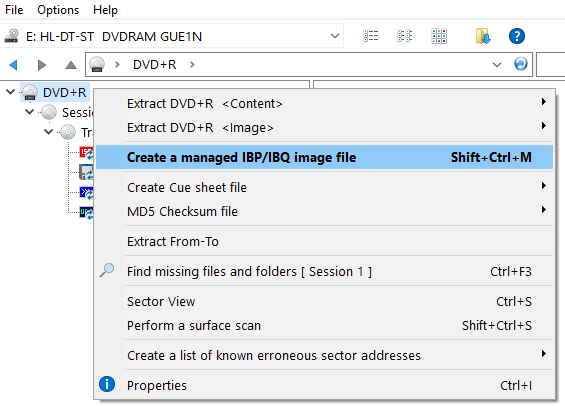
Creation of a managed image file, if not suggested to you automatically, can be created by right mouse clicking the top most CD/DVD or Device icon in the left hand side (TreeView) pane. The process looks much like making an ordinary image file. After creation, either partially or completely, you have to load the file, just as you would load any other image file. If creation was suggested to you before running a scan for missing files and folders, and you said yes to that request, then the file is automatically loaded right after creation, before the scan starts.
Completion
To complete a managed image file, load the image file (if not loaded already), right mouse click the top most CD/DVD or Device icon in the left hand side (TreeView) pane and you will find the option to complete the image file. IsoBuster will prompt you to insert the disc in a drive, select that drive and continue the process.
If there are gaps due to bad reads, you can select to retry them. You can select to only complete the image at the end. Or you have IsoBuster do them both.
Test to see if a disc is identical (relevant for optical discs)
After you start the image file completion sequence, and after you select a drive, IsoBuster will see if the disc in the drive matches the disc in the image file. That is and extremely difficult task for optical media as there are many funky CD and DVD formats out there and not all drives report the same layout for each disc each time. Optical media comes in many many forms and depending on the drive's capabilities and make there are a lot of different layouts possible for one single disc. IsoBuster tries to determine if the disc in the drive is the same as the disc in the image file and to be able to do that it has to assume a lot of things sometimes.
It is therefore extremely important that you as a user always use the correct optical disc to complete an image file. It is possible to complete an image file with a completely different disc, which has enough matching features. So you could be mixing two discs inside one image file. Of course this also means that if you have two identical disc copies, you can in fact use two bad discs to complete one good image of them. It simply requires some common sense sometimes but then the engineering power that comes with it is gigantic.
If you understand the complexity involved then you will also understand that sometimes the layout is too different to complete an image file with a certain disc. For instance if the drive you originally used to start making the image file saw two tracks but the drive you are using now to complete the image file sees only one track, then IsoBuster will fail the test and put up a message saying that the discs are too different. This problem will mostly only be experienced when you try to use different drives. One drive generally returns the same layout unless the drive has problems mounting the disc. If that appears to be the case, try mounting the disc again by opening and closing the drive tray.
Example : Suppose one drive sees two tracks in a session and another drive sees only one track in that same session, yet all files fit perfectly in these one or two tracks, then still the layout is too different for IsoBuster to complete the image file.
Ways to make sure you are always able to complete a managed image file with different hardware (relevant for optical discs)
Try to stick with hardware that has similar capabilities. E.g. a ROM drive will generally be much more limited than a writer. So if you start making an image file with a ROM drive then the layout of the disc may be very different from what the writer sees and the completion may never be initiated. The same principle goes for -R or +R or -RAM capable drives etc. A DVD+RW writer for instance may be very capable of reading most of the content on a DVD-RW disc BUT may see a different track and session layout than what a DVD-RW writer sees, simply because the DVD-RW writer understands more of the disc and hence sees a more complex or too different layout than what is stored in the file.
Quickly test if a disc can be completed by different hardware (relevant for optical discs)
To counter the problems explained above you can do a small test. Start creation of a managed file but abort the process immediately after it started. Next try different drives to complete the image. You will immediately notice which drives are able to continue and for which drives IsoBuster says there is no disc compatibility. Based on that small test you can then decide if it's worth it to start again, but this time right.
Influencing drive retries.
During managed image file creation IsoBuster reduces or increases retries as it sees fit, to get the best result. Of course it still starts from the settings provided by you (or the default settings). During managed image file completion and in particular when filling gaps the retries are less frequently reduced and the process is much more persistent. Here too the process however starts from the settings provided. However, realize that these settings are set per drive. So when you have a managed image file loaded, and you want to reduce the start retry count for the drive that will do the actual reading, first select that drive, go to the options and set the retry count for that drive. Don't set the retry count for the image file itself, as that won't change anything for the drive that is doing the actual reading.
Seeing less (file) data in an image file than on the actual disc.
A managed image file is created from start till end and can be stopped before that end is reached. So it is perfectly possible to have most of the data read into the file already but the end is still missing. A result may be that the files are not shown or not properly shown. This is because certain file-systems rely on the very last blocks of a track or session and only when these very last blocks are included in the image will suddenly everything look OK. An example for instance is an open track/session on a CD-R created by drag and drop software. The very last blocks contain the so called VAT and that VAT is important for the file-system, so only when the image file is completed will suddenly all files look OK.
Also see: Change or Test Managed Image File Properties (Experts)