Vind ontbrekende bestanden en mappen
Wat is het
Stel dat u een CD of DVD heeft gemaakt met drag-and-drop software (bijv. Direct CD, InCD, VOB Instant write, BHA B's gold, Packet CD, DLA, ...) en u merkt dat plotseling een deel of alle data verdwenen is. Of u heeft een bestand verwijderd en beseft ineens dat u het terug wilt hebben. Of Windows zegt dat uw USB-stick niet geformatteerd is. Of de CD of USB-stick is geformatteerd op een Mac. In al deze en vele andere situaties kan deze functie van IsoBuster een levensredder zijn!
Een scan naar ontbrekende bestanden en mappen kan wonderen doen, ongeacht het medium of de manier waarop de data op het medium is gezet.
Hoe
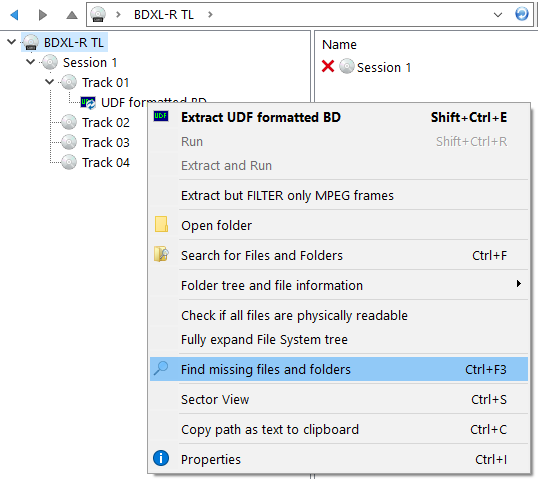
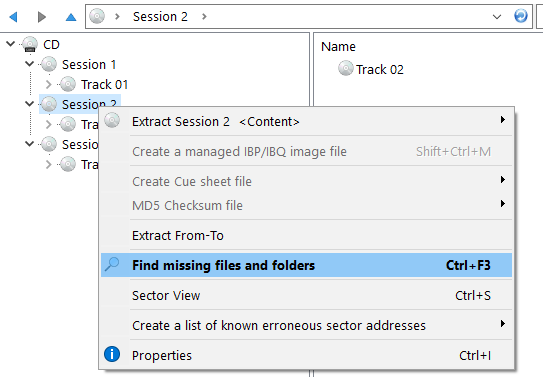
Selecteer de sessie of partitie waar u de data bent verloren (meestal de laatste sessie of partitie), en kies "Vind ontbrekende bestanden en mappen". Dit betekent, plaats de cursor op het sessie- of partitiepictogram en klik met de rechtermuisknop. Zie de schermafbeeldingen voor voorbeelden: (U kunt deze test ook starten vanaf het CD/Apparaatpictogram, een Track-pictogram of een Bestandssysteem-pictogram)
Wat gebeurt er
Wanneer u "Vind ontbrekende bestanden en mappen" selecteert, zal IsoBuster u vragen om eerst een managed image file aan te maken, tenzij u IsoBuster heeft ingesteld om niet meer te vragen. Om die instelling te wijzigen, vink hier aan. Een managed image file kan een geweldig hulpmiddel zijn omdat u slechts één keer door een mogelijk lange wachttijd hoeft te gaan. Slechte of beschadigde schijven die moeilijk te lezen zijn, kunnen lang duren om te scannen. Door eerst een managed image file te maken, kopieert u feitelijk alle data naar een speciaal bestand op de harde schijf en werkt u daarna van daaruit. U hoeft dus slechts één keer te wachten, daarna gaat het honderden keren sneller. Als u werd gevraagd om het image-bestand te maken en u klikte op ja, dan zal het image-bestand automatisch laden na aanmaak en zal de scan op het managed image file starten. Het maken van een managed image file is ideaal voor optische media, heeft veel voordelen voor Flash Drives enz., maar is waarschijnlijk minder nuttig voor harde schijven.
Als u ervaren bent en al een managed image file heeft gemaakt, laad dat bestand en werk van daaruit. Bijv. start de scan "Vind ontbrekende bestanden en mappen"
Als u niet werkt vanuit een managed image file, lees dit dan
Voordat u de schijf gaat scannen, kunt u overwegen om de Read Retry count te wijzigen. Doe dit op basis van uw ervaring met de optische drive die u gebruikt, voor andere media kunt u het beste de standaardinstelling laten. Bijv. als het scannen extreem lang duurt, kunt u afbreken en opnieuw starten met een veel lagere retry count. IsoBuster past echter automatisch een slimme retry-managementstrategie toe om het beste resultaat te bereiken. U moet weten dat IsoBuster intern ook het aantal retries aanpast op basis van type fouten en diverse omstandigheden, dus meestal doet IsoBuster dit werk al voor u.
Actie
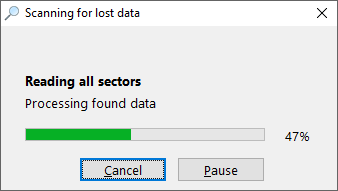
Zodra u "Vind ontbrekende bestanden en mappen" selecteert, zal IsoBuster alle sectors in de sessie of partitielezen. Tijdens deze volledige oppervlaktescan zal IsoBuster proberen ontbrekende bestanden te vinden met behulp van een verscheidenheid aan technieken. De herstelactie bestaat uit drie stappen:
- Eerst, reeds gevonden bestandssystemen (zoals UDF) worden volledig onderzocht om dubbele vondsten te voorkomen.
- Vervolgens wordt het volledige oppervlak gelezen en alle relevante data opgeslagen in het geheugen.
- Ten slotte wordt al die data verwerkt en in het slechtste geval is nog wat extra media toegang nodig tijdens die actie.
En nu wat
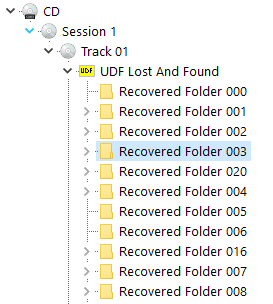
Wanneer het herstelproces is voltooid, en met een beetje geluk, heeft IsoBuster verloren en/of verwijderde bestanden en mappen gevonden. Bestanden en mappen in de 'Lost And Found' root hebben geen naam omdat de naam niet te achterhalen was; deze bestanden en mappen zijn weesbestanden. Bestanden en submappen in deze 'naamloze', 'verloren' of 'wees'-mappen hebben hun oorspronkelijke naam weer. Weesbestanden worden "Recovered File" genoemd en weesmappen "Recovered Directory".
IsoBuster heeft een unieke functie die alle inhoud van weesbestanden scant en probeert de bestandsextensie te bepalen. Bijv. zo kunt u, met een beetje geluk, .bmp, .gif, .jpg, .wav en veel andere bestandstypes onderscheiden.
Deze functie kan uitgeschakeld worden.
Gevonden UDF-data
A
 B
B 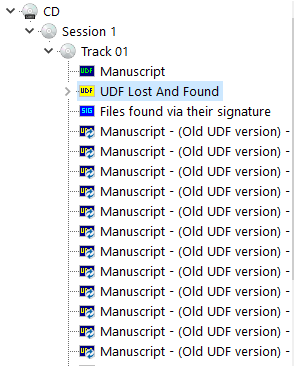
De gele
 'UDF Lost And Found' root-map wordt gekoppeld aan een track pictogram in de geselecteerde sessie (linkerpaneel). U kunt een naam wijzigen (bijv. 'Recovered Directory 01' naar 'Mijn Foto’s') door dat object (bestand of map, bijv. 'Recovered Directory 01') in de lijstweergave (paneel rechts) te selecteren en er eenmaal op te klikken of F2 te gebruiken. (probeer het en u ziet het).
Als u de herstelactie heeft uitgevoerd op sequentieel beschreven media (bijv. wat drag-and-drop applicaties doen op CD-R, DVD+R en DVD-R (sommige apps doen dit ook op herschrijfbare media)),zult u merken dat IsoBuster ook alle eerdere UDF-bestandssystemenheeft gevonden. De eerdere bestandssystemen tonen een oude versie van de bestanden en mappen.
 Dit betekent dat u een oude indeling van bestanden en mappen kunt herstellen, of terug kunt naar een oudere versie van een document dat u al meerdere keren bewerkt heeft. Deze optie biedt veel mogelijkheden...
Als oudere UDF-bestandssystemen worden gevonden, worden ze gekoppeld aan een blauw UDF-pictogram
bij een van de track-pictogrammen van de geselecteerde sessie. Ze worden ook gemarkeerd met ' - (Old Version) - '.Bestanden gevonden op basis van hun handtekening
Net als bij "UDF Lost and found" is er een lijst van bestanden gevonden via hun handtekening. Deze lijst (blauw pictogram gekoppeld aan track-pictogram
 ) kan exact dezelfde bestanden bevatten als de "Lost and found"-map. Deze bestanden worden eenvoudigweg via een geheel andere methode gevonden en bieden een alternatief wanneer één van de methoden geen resultaat oplevert.
DVD Video
Als u de scan heeft uitgevoerd op Video- en/of Audio-DVD’s, kan er ook een extra AUDIO / VIDEO-map zijn met gevonden IFO/BUP- en VOB-bestanden
 . Daarnaast kan deze map de verschillende opnames op +VR(W)-media en/of de verschillende AUDIO-opnames/tracks tonen.
Extraheer herstelde bestanden
Om gevonden bestanden en/of mappen te herstellen, extraheer zoals u normaal gesproken een bestand of map met IsoBuster extraheert. Klik met de rechtermuisknop en kies Extract (de eerste of bovenste optie in het popup-venster). De schermafbeelding toont de gevonden bestanden en mappen.
Fouten
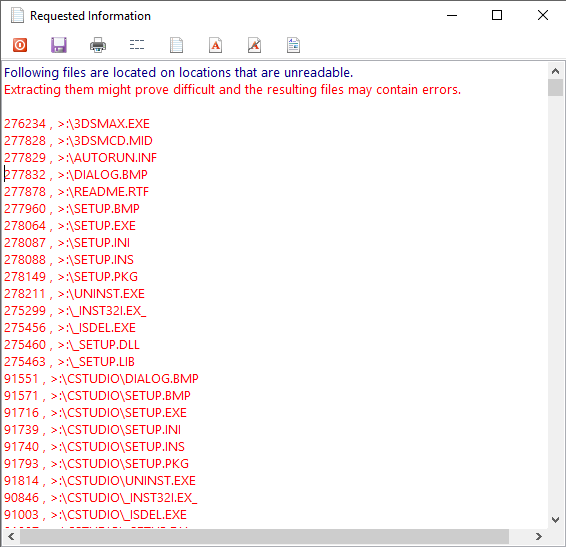
Als IsoBuster fouten detecteert tijdens de scan, worden die sectoren gemarkeerd. Na de scan, en als bestanden door fouten zijn getroffen (bijv. de bestanden bevinden zich in foutieve sectoren), genereert IsoBuster een lijst van alle getroffen bestanden. U kunt deze lijst bewerken, opslaan, afdrukken, ...
IsoBuster zal ook de scaninformatie gebruiken om een 'error'-pictogram
 toe te voegen naast elk bestand dat getroffen is en waarschijnlijk beschadigd is als u probeert het bestand te extraheren.
Bekijk ook deze geweldige online bronnen voor specifieke maar gerelateerde taken:
Hoe VIDEO-data van een DVD herstellen met IsoBuster.
Hoe een DVD opnieuw maken van de volledige set VIDEO_TS-bestanden op mijn harde schijf.
Hoe een DVD opnieuw samenstellen van één of meer VOB-bestanden op mijn harde schijf.
Hoe een DVD opnieuw maken van één of meer VOB-bestanden op mijn harde schijf.
Hoe een beschadigde videostream repareren zodat deze weer afgespeeld kan worden.
Krasjes van CD of DVD verwijderen.
Snel gewiste CD-RW vs. DVD-RW vs. DVD+RW, wat is herstelbaar en hoe.
Gebruik Sector View bij zoeken naar ontbrekende bestanden.