Gebruik van eigen bestandsherkenningsregels
Dit is voornamelijk bedoeld voor engineers en datarecovery-experts, hoewel elke enthousiasteling het gemakkelijk kan oppakken en ermee kan experimenteren!
IsoBuster kan op maat gedefinieerde regels laden en gebruiken om bestanden te vinden op basis van de gedefinieerde handtekening.
*.rules-bestanden zijn zuiver tekstbestanden die één regel per lijn bevatten en ze kunnen overal worden opgeslagen van waaruit u ze kunt laden. Of zet ze eenvoudig in de /plugins/ map
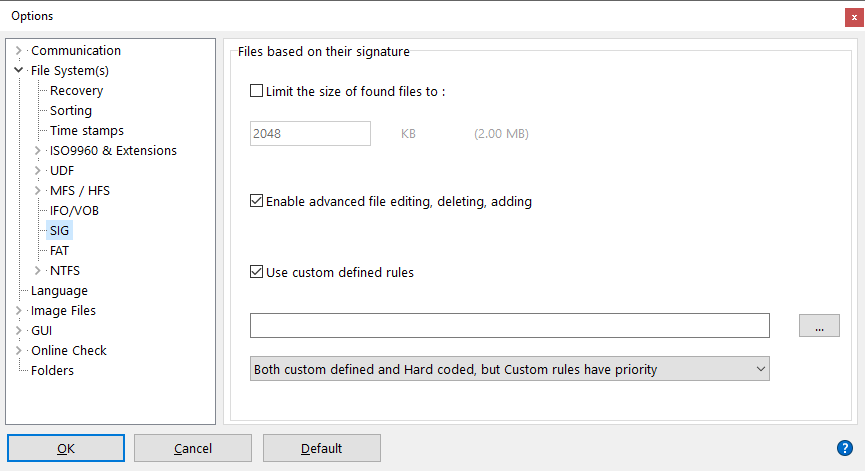
U kunt het *.rules-bestand selecteren dat IsoBuster moet gebruiken via opties. Zie de screenshot hierboven.
Wanneer het selectievakje "Gebruik op maat gedefinieerde regels" is aangevinkt, laadt IsoBuster het gedefinieerde *.rules-bestand bij elke "Vind ontbrekende bestanden en mappen" om de lijst "Bestanden gevonden op basis van hun handtekening" te vullen.
Er zijn drie mogelijke scenario's voor het gebruik van aangepaste regels. Ze kunnen worden geselecteerd via de dropdown onderaan het venster (zie screenshot hierboven):
- Alleen de op maat gedefinieerde regels.
- Zowel de hard-coded (in het programma ingebouwde) regels als de op maat gedefinieerde regels, maar eerst worden de op maat gedefinieerde regels gecontroleerd, en indien geen match, worden de hard-coded regels gebruikt.
- Zowel de hard-coded (in het programma ingebouwde) regels als de op maat gedefinieerde regels, maar eerst worden de hard-coded regels gebruikt, en indien geen match, worden de op maat gedefinieerde regels geprobeerd.
*.rules-bestanden bevatten één regel per lijn.
Omdat het parseren van een tekstbestand niet zo snel is als ingebouwde code, is de syntax van elke regel zeer strikt! Zodra de syntax niet voldoet aan de hieronder beschreven regels, zal de test falen of mogelijk een false positive veroorzaken.
Het is het beste alleen geldige regels in een *.rules-bestand te plaatsen en opmerkingen enz. buiten het bestand te houden, bijvoorbeeld in een tweede bestand, omdat dit de snelheid verbetert.
Om een regel te testen, kan het helpen het doeldtypebestand in IsoBuster te laden (als vermoedelijk image-bestand) en "Vind ontbrekende bestanden en mappen" uit te voeren. Als de gedefinieerde handtekening wordt gevonden op adres (LBA) 0, werkt de regel.
Elke regel wordt getest tegen elk gelezen blok.
Dus voor elk blok wordt de volledige lijst van alle regels gecontroleerd voordat naar het volgende blok wordt gegaan.
Als het medium optisch is (CD, DVD, BD), wordt de regel elke 2048 bytes geactiveerd. Als het een harde schijf of USB-stick is, wordt de regel getest tegen elk 512-bytesblok of elk 4096-bytesblok op 4kn-schijven.
De startoffset is 0 in elk blok, tenzij IsoBuster een bestandssysteemstructuur detecteert die een mogelijk bestand binnen hetzelfde blok voorafgaat. Bijvoorbeeld bestanden die zijn ingebed in NTFS- of FAT-bestandsbeschrijvingen.
Blokken met bepaalde bestandssysteemstructuren die geen bestandsgegevens bevatten, worden overgeslagen en niet verder getest.
Elk blok wordt getest tegen elke regel in het regelsbestand totdat een regel overeenkomt met de gegevens, waarna het volgende blok wordt getest.
Elke regel werkt per byte, begint bij index 0 van het weergegeven blok en gaat naar de volgende byte zodra een byte is getest tegen de waarde in de regel.
Elk commando op de regel wordt voorafgegaan door een backslash en is slechts één teken groot. Dus backslash en commando samen zijn altijd 2 tekens.
De waarden en commando's in een regel / lijn:
\%
Een opmerking [Functionaliteit beschikbaar sinds IsoBuster 4.7]
Alles wat volgt na dit commando op een regel wordt genegeerd. Alles ervoor wordt normaal verwerkt. Voeg dus geen voorloopspaties toe, deze vertragen alleen het scanproces
\i()
Ken een unieke ID toe aan een regel [Functionaliteit beschikbaar sinds IsoBuster 4.7]
Hiermee kunnen andere commando's, die ID-bewust zijn, hun magie toepassen op deze specifieke regel of het bestand dat door deze regel is gevonden
Een ID kan niet 0 (nul) zijn en moet kleiner of gelijk zijn aan 65535 (0xFFFF)
\e()
Sluit een eerder gevonden bestand (dat nog open is) af [Functionaliteit beschikbaar sinds IsoBuster 4.7]
Dit commando is ID-bewust (geef de ID tussen de haakjes op)
Wanneer een bestand via de handtekening is gevonden, maar nog geen nieuwe handtekening is gedetecteerd en de bestandsgrootte dus nog groeit, kan dit commando worden gebruikt om het bestand te beëindigen
Idealiter wordt het gebruikt met een ID die overeenkomt met een andere regel (en dus type bestand)
Als geen waarde/ID is opgegeven tussen de haakjes, 'beëindigt' dit commando elkgevonden bestand dat nog groeit.
In dat laatste scenario wordt het gebruikt om handtekeningen te detecteren die elk bestand beëindigen, maar zelf geen deel uitmaken van bestanden.
\c()
Voeg samen met een eerder gevonden bestand (dat nog open is) [Functionaliteit beschikbaar sinds IsoBuster 4.7]
Dit commando is ID-bewust (geef de ID tussen de haakjes op)
Wanneer de handtekening in deze regel overeenkomt met de gegevens, wordt het eerder gevonden bestand niet afgesloten en een nieuw bestand gestart, maar blijft het eerder gevonden bestand doorgroeien
De gegevens worden dus toegevoegd aan het eerder gevonden bestand. Dit lijkt misschien nutteloos, maar is bijzonder handig bij terugkerende handtekeningen in bestanden.
In plaats van x bestanden te vinden telkens wanneer de handtekening wordt gedetecteerd, helpt het één bestand te vinden dat de x handtekeningen bevat.
Bijvoorbeeld regel \i(1)\c(1)\x00\x00\x01\xba\|.VOB zorgt ervoor dat niet x VOB-bestanden van 2048 bytes worden gevonden, maar één bestand met x * 2048 bytes
\#
Het bepalen van de grootte van een bestand is giswerk. Over het algemeen wordt de bestandsgrootte bepaald door de startlocatie van het volgende bestand of door een bestandssysteemstructuur die wordt gevonden.
Als IsoBuster een bestandssysteemstructuur tegenkomt en dus aanneemt dat het eerder gevonden bestand hier eindigt, wordt een boolean-parameter doorgegeven aan de volgende test/blok.
Deze boolean-parameter kan worden gebruikt om alleente activeren wanneer de boolean-waarde waar is. Commando \#doet precies dat.
Bijvoorbeeld, stel dat u weet dat een bestand begint met twee byte-waarden \x1F\x8B
Deze handtekening is echter zo generiek dat deze vaak voorkomt in bestaande bestanden, wat veel false positives veroorzaakt en eerder gevonden bestanden inkort.
Zo’n regel is het beste weg te laten, maar u kunt deze nog steeds toestaan, maar alleen wanneer IsoBuster aangeeft dat eerder gevonden bestand toch al was beëindigd.
In dat geval kunt u regel \#\x1F\x8B\|.gzgebruiken
Maak \# het eerste commando op een regel als u het gebruikt. Dit verbetert de snelheid aanzienlijk.
\|
Om redenen van snelheid begint elke regel met de test en wordt beëindigd met commando \|
\| wordt gevolgd door de extensie, bijvoorbeeld: \#\x1F\x8B\|.gz
en optioneel kan de extensie worden gevolgd door |bestands-grootte in bytes. Dit kan worden gebruikt wanneer u weethoe groot het bestand werkelijk is. Bijvoorbeeld: \#\x01\x02\|.gz|1000
\x
Elke byte-test in de regel kan op twee manieren worden opgegeven. Als hexadecimale waarde \x00of als ASCII-waarde (zie verder).
De syntax is zeer strikt. Er moet altijd twee tekens zijn in hexadecimale notatie en het bereik is (uiteraard) \x00 - \xFF
Het is ook mogelijk slechts een nibble te testen. Gebruik in dat geval ?voor de nibble die u niet wilt testen. Bijvoorbeeld \0x?3komt overeen met byte-waarden 0xF3, 0xE3, 0xD3, ..., 0x23, 0x13, 0x03.
\x??betekent dat u deze byte helemaal niet wilt testen, het kan elke waarde hebben, hetzelfde als een byte overslaan. Bijvoorbeeld in sequentie: \0x00\0x01\x??\x01\x00 bytes 0,1,3 en 4 moeten overeenkomen, byte 2 kan elke waarde hebben.
PS. Gebruik de nibble wildcard ?niet in byte-waarden die kleiner of groter (of gelijk) moeten zijn dan. Dus niet in combinatie met \> of \< of \>= of \<=, want dat heeft onvoorspelbare effecten.
ASCII-teken
Alle leesbare tekens tussen bytewaarde 32 en 126 kunnen worden gebruikt om tegen te testen.
Bijvoorbeeld: GIF\|.gif is een geldige test, en is in feite hetzelfde als: \x47IF\|.gif of G\x49F\|.gifenz.
\ is ook een geldig teken, maar omdat de backslash wordt gebruikt om speciale waarden en commando’s te ontsnappen, moetu de \verdubbelen wanneer u het als testwaarde gebruikt: \\
\v()
Vergelijk de bytewaarde op de huidige offset met een bytewaarde op de offset gedefinieerd met \v()
De waarde tussen de ronde haakjes is decimaal of hexadecimaal. Het laatste vereist de notatie 0x, bijvoorbeeld \v(0x0F) test of de huidige bytewaarde overeenkomt met de bytewaarde op offset 15. Dit commando kan worden gecombineerd met \> \< \<= en \>=
Bijvoorbeeld: \v(5)\x10test of de eerste byte op offset 0 overeenkomt met de byte op offset 5 en zo ja, test of de tweede byte op offset 1 overeenkomt met 0x10
\p()
Wijzig de absolute Positie / Offset in het datablock voordat de volgende test wordt uitgevoerd
Bijvoorbeeld: \p(3)\x01\x02betekent dat de offset verandert van 0 naar 3, en byte 3 in het datablock moet 0x01 overeenkomen en byte 4 moet 0x02 overeenkomen
U kunt naar elke positie in het datablock springen, maar u moet binnen de grenzen van het blok blijven, anders faalt de test.
U kunt heen en weer springen als dat logisch is. Bijvoorbeeld, om snelheid te verhogen, test een zeer strikte byte verder in het blok en spring pas terug naar het begin van het blok om andere bytes te testen.
Bijvoorbeeld: \p(100)PP\p(0)\f(100,OK)test op de aanwezigheid van "P" op offset 100 en "P" op offset 101, en als dat waar is, zoekt verder in de eerste 100 bytes naar "OK"
De waarde tussen de ronde haakjes is decimaal of hexadecimaal. Het laatste vereist notatie 0xbijvoorbeeld \p(0xFF) springt naar offset 255 enz.
\s()
Verander de positie door saantal bytes vanaf de huidige positie over te slaan.
Bijvoorbeeld eerder gebruikt voorbeeld: \0x00\0x01\x??\x01\x00 kan ook worden geschreven als: \0x00\0x01\s(1)\x01\x00
De waarde tussen de ronde haakjes is decimaal of hexadecimaal. Het laatste vereist de notatie 0xbijvoorbeeld \s(0x10) slaat 16 bytes over.
Het is ook mogelijk een negatief aantal bytes over te slaan (alleen decimale notatie).
Bijvoorbeeld \s(-1) slaat een byte terug. Dit kan nuttig zijn om een enkele byte te testen tegen verschillende parameters. Bijvoorbeeld als een bytewaarde tussen twee waarden ligt.
Bijvoorbeeld: \>\x10\s(-1)\<\=\x20test of een bytewaarde groter is dan 16 en kleiner of gelijk aan 32.
\=
= is impliciet en overbodig.
Elke byte-test gaat ervan uit dat de byte in het datablock overeenkomt met de byte in de regel
Echter, als geplaatst achter \>of \<bijvoorbeeld \>\= of \<\= betekent dit >= of <=
\>
Plaats \> voor een bytewaarde, bijvoorbeeld \>\x33betekent dat de byte in het datablock groter moet zijn dan 0x33 (in plaats van gelijk aan 0x33)
Wanneer direct gevolgd door \=, vertaalt het naar >= bijvoorbeeld \>\=\x33betekent dat de byte in het datablock groter of gelijk moet zijn aan 0x33
\<
Plaats \< voor een bytewaarde, bijvoorbeeld \<\x50betekent dat de byte in het datablock kleiner moet zijn dan 0x50 (in plaats van gelijk aan 0x50)
Wanneer direct gevolgd door \=, vertaalt het naar <=
\f()
Vind een conditie vanaf de startoffset, over een gedefinieerd bereik. Als de conditie wordt voldaan, bevindt de volgende offset zich net na de gezochte conditie.
De syntax moet\f(bereik,conditie) zijn
Houd het bereik binnen het blok. De conditie kan vrijwel alles zijn dat kan worden gedefinieerd met alle hier beschreven commando's en waarden, behalveandere \f() commando's.
\f() commando's kunnen niet genest worden.
Bijvoorbeeld \f(100,Peter)zoekt naar "Peter" binnen een blok, vanaf offset 0 en binnen 100 bytes.
Bijvoorbeeld \p(10)\f(100,Peter) start dezelfde zoekopdracht vanaf offset 10 over een bereik van 100 bytes
Bijvoorbeeld \p(10)\f(100,Peter) aka IsoBuster\x00 zoekt naar "Peter" en controleert of het gevolgd wordt door null-terminated " aka IsoBuster"
Gebruik dit commando alleen indien nodig. Bijvoorbeeld als enige regel in een rules-bestand, om iets zeer specifieks te zoeken, omdat dit commando de zoekopdracht aanzienlijk vertraagt.
Natuurlijk, als u de regel start met een byte op een vaste positie die eerst een bepaalde waarde moet hebben, wordt de zoekopdracht alleen uitgevoerd als die vaste locatie overeenkomt. Dit kan de snelheid aanzienlijk verhogen
In dit voorbeeld: \xEF\xBB\xBF\f(4,<?xml)\|.xmlkunnen maximaal 4 spaties of lege karakters vóór de <?xml-tag in dit UTF8 XML-bestand aanwezig zijn.
\o()
OF verschillende tests. Niet alleen byte-waarden (wat natuurlijk mogelijk is) maar ook gehele sequenties indien gewenst.
De waarde tussen de ronde haakjes is het aantal OR-tests dat uitgevoerd moet worden.
\o()moet ook worden gebruikt tussen elke mogelijke test van de OR-testreeks en moet ook de reeks afsluiten.
Bijvoorbeeld: \o(2)A\o()B\o()test of de byte op offset 0 ASCII A of B is
De waarde tussen de ronde haakjes is decimaal of hexadecimaal, het laatste vereist de notatie 0xbijvoorbeeld \p(0x03) betekent 3
Bijvoorbeeld \o(2)betekent dat er twee tests moeten worden uitgevoerd.
Als de eerste test niet overeenkomt, wordt de tweede uitgevoerd. Als de eerste overeenkomt, wordt de tweede genegeerd. Dit kan ook met meer tests, bijvoorbeeld 4 tests: \o(4). Waarden 0 en 1 zijn echter niet toegestaan en doen de regel falen!
\o() accepteert ook een enkel door de gebruiker gedefinieerd teken. Dit is een soort bookmark. De syntax is: \o(waarde,code)
De gebruiker-definieerde code is niet noodzakelijk voor normale OR-tests, maar bij geneste OR-tests is dit absoluut nodig!
Bijvoorbeeld \o(2,a)betekent dat er twee tests moeten worden OR-ed en de gebruiker gedefinieerde code is 'a'
De syntax met code kan altijd worden gebruikt, maar is alleen absoluut nodig bij geneste OR-tests.
De \o() syntax is zeer strikt en moet\o() tussenelke test bevatten enaan het einde van de reeks.
In het geval van een code, moet de code tussen de haakjes staan. Zonder code, moet er nietstussen de haakjes staan.
Bijvoorbeeld: \o(3)\x11\o()\x22\o()\0x33\o() Dit betekent dat de bytewaarde op de opgegeven offset 0x11, 0x22 of 0x33 kan zijn
Bij gebruik van een code: \o(3,a)\x11\o(a)\x22\o(a)\0x33\o(a)
Een belangrijkbijeffect van \o() is dat de offset nietverandert na de test. Voor andere tests neemt de offset automatisch met 1 toe. Na een \o() test blijft de offset echter op dezelfde positie, omdat subtests variabele lengte hebben.
Bijvoorbeeld: \o(3)\x11\o()\x22\o()\0x33\o()\s(1)0x44\|.blah
Een voorbeeld van geneste \o() test: \o(3)\x11\o()\x22\o(2,a)\x23\o(a)\x24\o(a)\o()\0x33\o()
Gebruik de code om de parser te helpen bepalen welke test bij welke subtest hoort.
Elk subtest is een test op zich en kan elk van de hierboven gebruikte commando's en waarden gebruiken. Gebruik codes bij geneste \o() zoals \o(2,c) ...
Enkele voorbeelden uit de praktijk:
LZANIM\|.lza
\xFF\xD8\xFF\o(2)\xE?\o()\xFE\o()\|.jpg
GIF\o(2)8\o()\#\x??\o()\|.gif
\#ID3\|.mp3
MM\x00\x2A\|.kdc
\x4F\x67\x67\x53\x00\x02\x00\x00\x00\x00\x00\x00\x00\x00\|.ogg
SFW/|.sfw
\x60\xEA\o(2)\p(8)\x10\x00\x02\o()\#\x??\o()\|.arj
gzip-\>\=1\s(-1)\<\=9.\>\=1\s(-1)\<\=9.\>\=1\s(-1)\<\=9\|.gz
\xEF\xBB\xBF\f(4,<?xml)\|.xml
MSWIM\x00\x00\|.wim
\x01\p(0x13)\x3E\x40\p(7)\x00\x00\x00\x00\x00\x00\x00\x00\x00\x00\x00\x00\|.btd
\x00\p(0x80)DICM\f(200,1.2.840.10008.1.3.10)\p(1)\x00\x00\x00\x00\x00\x00\x00\x00\x00\x00\x00\x00\x00\x00\x00\x00\x00\x00\|.dicomdir
\x00\p(0x80)DICM\p(1)\x00\x00\x00\x00\x00\x00\x00\x00\x00\x00\x00\x00\x00\x00\x00\x00\x00\x00\|.dcm
%vsm%\s(3)\x00P\x00r\x00o\x00d\x00u\x00c\x00e\x00d\p(0x29)S\x00o\x00f\x00t\x00w\x00a\x00r\x00e\|.vp3
#PES0001\|.pes
\x??Embird Outline Format v\|.eof
\x??\x00\x00\x00\x0A\x00\x00\x0020\|.jef