Installation guide for IsoBuster
IsoBuster is a powerful utility with many uses. The two most popular and used functions are:
- Data Recovery
- Opening (and extracting data from) Image files. (Note that IsoBuster is not an editor!)
Most of the installation options are straightforward but the Select file associations window might be a bit confusing. This option exists mainly for the second use of IsoBuster which is opening of Image files.
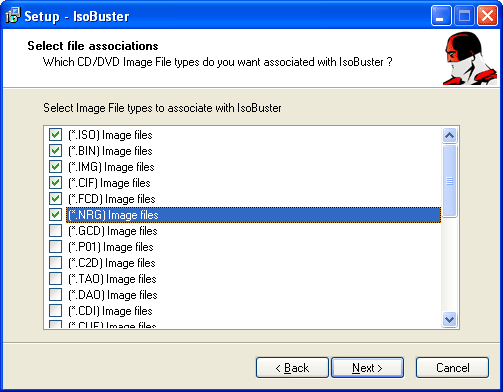
Image files are identical copies of the media, for instance CDs or DVDs, stored block per block, in regular files which you can keep on a Hard Drive or any other medium. IsoBuster is able to open these files and treat them as a regular media. More on this in the help file.
The extensions you can select in the "Select file associations" window are extensions of such image files. Image files come in many flavors, created by many different applications. Therefore there are so many different extensions listed in the "Select file associations" window. You can still change these associations after installation, in IsoBuster itself. So no problem if you don't know yet.
Example: a *.ISO file is the most common image file variant out there and is supported by different write applications. If you check (*.ISO) in the "Select file associations" window, after installation, when you double click an .iso file, IsoBuster will automatically start and load the image file and will show you all the files in the image, as if the image file were a CD or DVD.
If your sole use will be: Data Recovery. Then there is no need to check these extensions in the "Select file associations" window. However if you want to keep IsoBuster installed on your system, then it makes sense to select them anyway. Next time when you're confronted with an image file, IsoBuster will be installed and ready to open the image file for you.
Also take advantage of the help file which is installed always. If you have the program running and you're unsure of what to do next, hit the "F1" key or click the question mark help button. Alternatively, check the help file(s) online.
If your main reason for installing IsoBuster is Data Recovery and you have no prior experience with IsoBuster, then here's the golden tip:
After installation:
- Start IsoBuster.
- Insert the CD, DVD or BD in your drive (if you are recovering from optical media).
- Make sure the drive is selected in IsoBuster (See help).
- Let the CD or DVD mount (in case of optical), once mounted you will see the disc layout (Tracks and sessions, or partitions).
- If files can be found they will be listed automatically as well.
- If no files, or not all files, are found right away, right mouse click the track icon and select: First let it make the managed image file, or not. Next let the scan complete.
Also understand that IsoBuster is very much right-mouse-click based. Right click the object (e.g.: track, session, file, directory,...) you want to do something with and make a selection.